Working Free GPRS 3G 2G Tricks for Airtel and Vodafone 2015

Setting for Airtel For Free GPRS 3G 2G or Internet


Access point name (APN) :- airtelgprs.com
Homepage :- buddies.airtelmone.in
Profile name: TechExtremity
proxy:- koxy.de
port :- 80

How to Get GPRS 3G 2G Internet on Vodafone Mobile Phone


Setting for Vodafone For Free GPRS 3G 2G or Internet

Homepage : 180.179.149.11
Proxy : 192.110.165.94
port 80

- - Or - -

Account Name: TricksLive.tk
Access Point: portalnmms
Proxy: 110.11.101.11 5. Port: 9401

A Beginner’s Guide to Google AdSense

Sure, affiliate marketing is an excellent way to monetize a web site or blog. It has the amazing benefit of not requiring stock, and in many cases it’s a set and forget strategy. Often though, many affiliates, including myself, will also run Google AdSense on their web sites.
Adsense is a nice alternative, or complimentary monetization strategy to affiliate marketing.

My income increases when using AdSense – my affiliate sales are unaffected

It used to be that I was afraid to “lose customers” when implementing Google AdSense on my affiliate sites, because when they click the AdSense ads they leave the web site. But test after test showed me that implementing AdSense often did not have any negative effect on affiliate commissions.
So, really all it did was boost my income and allowed me to distribute risk by having more than just one monetization strategy.

AdSense ads run in designated areas on your web site – advertisers pay Google to run ads there – but you get a cut

Many people still ask the question: what is Google AdSense, and how do I get started?
I am in the position where I run a multi-author WordPress news web site and one of the attractions is that we allow authors to include AdSense on their articles. Many though, it turns out, do not know what AdSense is and don’t know how to get setup.
First, let me explain as simply as possible what AdSense is. When advertisers pay Google to run ads (with the Google AdWords program), if they opt to show their ads on Google’s Display Network, then their ads will show up in the “AdSense slots” on participating web sites.
In many cases, the owner of the web site “owns” (in a sense) all of the Google AdSense ad slots. In the case of a multi-author web site, it could be that the owner allows a sharing of revenue. In that case, there could be several publisher AdSense as slots being displayed on a given web site.

You must “own” the web site used during the Google AdSense application process – but could run ads on other sites after acceptance

It used to be that you could submit an application to become an AdSense publisher, enter “any old web site” and in most cases get approved, ready to run ads on any other site of your choosing. Nowadays though, as I discovered, Google now has a second level of verification, complicating things a little more. The publisher must now prove that they own the web site that they intend to run ads on.
When I say “own the web site” that is sort of a loose statement. Many times, as long as the publisher has the ability to create AdSense ads (either through direct code access, or some sort of widget) he or she could make it through the second stage of AdSense approval. That’s not always the case though. Having the ability to add AdSense code to a web site doesn’t necessarily qualify you as the “owner.” And Google’s recent(ish) requirement is that the publisher must own the domain of the web site that they use during the application process. It’s only after approval where the publisher can run ads on different web sites.
If you know someone that owns a web site and will let you “piggyback” you *may* get through the application process. But after awhile, Google stops allowing certain domain names to be used during the application process. Because like I said, technically you must own the domain. It seems the goal is to have at least one web site for every AdSense publisher, and this is the way they attempt to make that happen.

Buy a cheap domain name and attach it to a free web site creation service and you qualify

Fortunately, it’s quite simple these days to “own your own domain name” and create your own web site. And this doesn’t have to be expensive either. You don’t really have to go the route of getting your own hosting and getting a web site built (although that can be super cheap, especially when using WordPress). Realistically you can get a domain for $10-$15 (for the year) through Namecheap.com and build a free web site on Weebly.com (for example), attach your newly bought domain name to your newly created web site, and then you comply to the main rule of requiring your own domain name.
Be careful though when choosing a service. Some free web site tools, while they might allow you to attach a domain name to your site, you may not be able to run AdSense. WordPress.com hosted sites is an example of one where you cannot run AdSense ads. To keep it simple and cheap, I would suggest buying a domain from NameCheap, then setting up a quick free site with Weebly.com.
From there, publish really awesome, high value, content on your new site. Aim for about 6-20 really good articles before applying. Be sure to include a contact and about page for a better chance of getting accepted.
Fortunately you can re-apply to AdSense if ever rejected. Follow the advice Google gives if you get rejected, then re-apply. If you applied with a domain that you can’t add AdSense code too, you still have the chance to re-apply with a different domain name/web site.

What types of ads show up in the ad slots, and how do I generate income from it?

Now, for those of you that are curious, and would like to know about what types of ads show up in the AdSense slots, I will cover that now.
Keep in mind that you are giving control of a certain portion of your web site to Google to do what it pleases. You have some control over appearance, size, etc. plus you have the ability to block ads. And you can decide if the ads are text, images or animated. There may be other kinds as well.
Now, as for what ads show up. There are a few different things that can happen. First, the traditional way is… Google will determine what the content surrounding the ad slot is about, and display a related ad. Another way is… Google will follow a visitor from site to site (using what are called cookies) and then run ads attempting to get those visitors *back* to a previously visited site. This is often called retargeting, and only happens when the owner of the previously visited site has paid to run retargeting-style ads on the Display Network. The final way is for advertisers to run ads in very specific ad slots, on very specific web pages, on very specific web sites. There may also be other ways. These are the only three that I am aware of.
Oh, and a key piece of information that I should have mentioned earlier on… you get paid when people click your ads (don’t click your own! Google will know) and you may get paid per impression (or multiple impressions) in some cases. I don’t know for certain. I just know that Google AdWords advertisers have the ability to choose a pay per click or pay per 1,000 impressions model when running their ads, but to my knowledge, the revenue share for AdSense follows just a pay-per-click model.

As far as I know, Google AdSense tracking is lacking

Tracking the performance of your AdSense ads is very limited. I haven’t looked too deep into tracking methods lately, so it may have improved, so take this information with a grain of salt (or whatever that saying is that doesn’t make much sense). In general, you create an “ad channel” and that will help you determine the performance of the ad (or ads) *attached” to that channel. Many sites allow you to embed AdSense in templates or widgets so usually the same ad is used on the entire site. Therefore, tracking on the site level is often what occurs. But, folks will often track on the ad slot/web site level as well.
You could get clever and manually create an ad and ad channel for every page on your site. This could get very cumbersome. There’s got to be a better way, and there probably is. I won’t research it now though, this is just an “intro” article after all.

Applying for an AdSense publisher account – use your Gmail account!

Now, to apply you will need to have your web site setup already (with your own domain name and content!). Then, using your Google account (i.e. Gmail or YouTube account) go through the app process.
After Google peeps at your site, it will let you know if it qualifies or not. If so, you just have to place your code. The code will initially be blank after placement on your site. Once an ad shows up, you know that your account is active. After your account is active you can create new ads to run on other sites
The app process could take anywhere from one day to a couple of weeks or longer. Just be patient and wait it out. Google sends emails through each phase so you will know where you’re at. If you don’t see an email for quite awhile it may have got lost. That happens. Have a peek in your AdSense account and you will see messages across the top indicating where you’re at in the process.
Enjoy your new revenue stream, some people make a living at it!

Simple Download Monitor – A Great Way to Offer Files to Visitors

Simple Download Monitor is a WordPress plugin that lets you offer digital files to your visitors. In addition to managing your files, the plugin will also track the number of downloads by visitors.
I have used a few different download management WordPress plugins over the years and I was impressed with how it works. It has everything you need, but is still very easy to use.
In this article, I would like to show you how easy it is to use the plugin to offer downloadable files to your visitors.

Using Simple Download Monitor

Simple Download Monitor uses a custom post type for downloads, so you will feel at home with the process of adding new download files. A title and description can be added for your download file easily. You can also assign tags and categories.
Files can be uploaded via the WordPress media interface. However, if you are having problems with uploading a particular type of file to WordPress, or if your file is being hosted elsewhere; you can enter the URL of the file instead.
Add a New Download
It will only take you a minute to add a new download file.
A thumbnail can be defined for each download file and then inserted into a post or page using a shortcode. A button is also available in the WordPress visual editor so that you can easily insert downloads into articles.
At the bottom of the page is a note of the current number of downloads. This number can be increased by a specified offset. This is useful if you are moving from another download solution and do not want your existing number of downloads reset. Or if you simply want to suggest that a file has been downloaded more times than it actually has been downloaded.
Configuring Your Download
Simple Download Monitor lets you see, at a glance, how many times a file has been downloaded.
Once you have inserted your file into your post or page, it will be displayed in your article. The shortcode can be used in conjunction with member plugins and content protection plugins so that it is only shown to registered members.
File Download Button
The file download button.
The plugin tracks every single download of your files. It details the file that was downloaded, the time and date the file was downloaded, and the IP address of the person who downloaded the file.
Download Logs
Download logs provide information on who has been downloading your files.
The downloads page helps you see what downloadable files you have uploaded. Downloads can be rearranged by different factors, such as category and total number of downloads.
Download List
Details of every download file can be seen in your list of downloads.
Simple Download Monitor has a basic settings area that allows you to remove the download button from the visual editor. You can also choose from one of ten colors for the download button.
Simple Download Monitor Settings
That is all you have to do to offer downloads through your website using Simple Download Monitor. As you can see, there are few steps involved in adding a download file to your website.
Check out the video below to see the plugin in action :)

Overview

Simple Download Monitor may not offer as many bells and whistles as some alternatives, however this means it is less complex and much easier to use.
If you are looking for a simple yet functional way of offering downloads to your visitors, I highly recommend Simple Download Monitor.

Top 12 Reasons Your Website Needs to be Responsive to grow Your Business

Have you been outside lately? You know how you are seeing more people using tablets and smartphones? Well, it’s not a trend as much as the norm any more. Walking around, we are plugged in to our mobile device. At some restaurants, the waiter or waitress takes our order. Mobile is ubiquitous. So why, why, why are there still so many businesses that have not yet adapted? I don’t know, and the good news is that you have a way to take advantage of the new reality.
As smartphones and tablets are ever more capable of performing tasks that used to be only capable on desktop, one thing is crystal clear: Internet surfing, connecting on social media, checking emails and online shopping is being taken over by mobile.
Naturally, because mobile Internet usage is steadily increasing, you can see that it’s extremely important that your website is mobile friendly. In the past, you had a website designed for desktop users and another site specifically developed for mobile users. But, now we need a website optimized for desktop, tablet and, mobile. Are you really gonna build multiple unique sites to accommodate the various screen sizes?
There actually is a method to satisfy many types of users. It’s called responsive web design. According to a report by Morgan Stanley, Mobile Devices will overtake Desktop usage this year. 2013 may have been hailed as “The Year of Responsive Design”, but RWD is far from last year’s news. Put simply, having responsive design means a website adjusts depending on which device they are being displayed on, ensuring that whether the content is viewed on a phone, tablet, or desktop computer, the website will remain user-friendly, which is ultimately the most important feature of any website or blog. So as though you really needed them, here are the Top 12 Reasons to convert to Responsive Web Design.

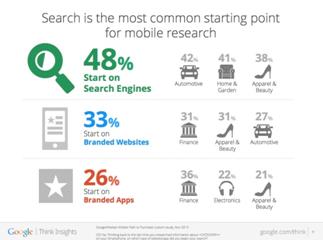
1. Recommended By Google

Since Google is the primary search engine to impress with your website, it is smart to follow what Google loves. Google not only recommends Responsive Web Design (RWD) as the best way to target mobile and tablet users, and also favors mobile-optimized sites when presenting results for searches made on a mobile device. This is especially true when mobile users search for local services. It’s important to note more searches are originated on mobile devices.
Of course there is still debate whether a separate mobile website or a single, responsive site is the best route to take. From an SEO perspective, a single site is the better option (More on this later). Separate mobile websites have their own URL and different code, whereas responsive sites use one URL and one set of pages and files, making it simpler for Google more efficient for Google to crawl, index, and organize content and avoids issues of duplicate content.
With 67 percent search market share, when Google speaks, search marketing professionals listen. Google now states that responsive web design is the industry best practice.
When you think about it, it’s also easier and less confusing for users to share, interact with, and link to than content on a stripped down mobile site.
For instance, a mobile user who shares content from a mobile site with a friend on the Facebook app who then accesses that content using a desktop, which results in that user viewing a stripped down mobile site on their desktop. This creates a less than optimal user-experience, and because of the large emphasis Google is now placing on user-experience as a ranking factor, this is essential to take into account with regards to SEO.
search-on-mobile-devices

2. One Website, Multiple Devices

Providing a great user-experience across multiple devices and screen sizes is the most appealing and most critical aspects of responsive web design for today’s uber mobile world. Take the following example. I search for a birthday gift on my smartphone during a break at work. I then continue researching this product on the same site on my MAC when I get home.
Because the site is responsive, won’t be frustrated with the extra steps to locate the desktop version of the site, and find the product all over again.

3. Easier to Manage

Having a separate desktop and mobile site requires having separate Google Adwords campaigns, SEO campaigns and separate Google Analytics reports. Managing one site is of course, far easier than managing two sites.
There can be an argument made for multiple sites though, such as having a mobile-specific Adwards and SEO strategy, such as optimizing for keywords that are more likely to be searched when someone is on their smartphone.

4. Positive User Experience Is Key

If a user lands on your mobile website and is frustrated or doesn’t see what they are looking for, according to Google’s Think Insights on Mobile, there’s a 61% chance they will leave and go to a different website. Data shows a positive experience with your responsive website a user is 67% more likely to buy a product or use a service.

5. Blogging and Social Activities Bring Mobile Visitors

If you’re like most smart Inbound Marketers and incorporate blogging and social media in your strategy, you have most likely been seeing increased mobile traffic. A recent study by ComScore cites that 55% of social media consumption happens on a mobile device. SHOCKER!

6. Responsive Design is Preferred for SEO

Typically, Responsive Websites perform better and are easier to maintain. One thing not mentioned above is that a challenge of having a separate mobile site is that you will need to build the authority of this site from scratch, and who wants to go to that extra trouble?

7. Responsive Helps Combat a High Bounce Rate

Even if your regular website is sitting pretty in search results, if it looks and performs like crap on my tablet or smartphone, bounce rate will be a big problem. Non responsive websites will suffer from a high bounce rate if the content is too stripped down, or just plain clunky and too challenging to work with compared to the content offered on the main/desktop site. Google will naturally interpret this high bounce rate as a sign that a website irrelevant, which will lead to your drop in rankings, which is why we don’t see mobile versions of sites ranked high.
RWD means that there is no more compromising on the content you choose to display!

8. A Speedy Responsive Website is Key

The content per page on a mobile or tablet device should load in under 1 – 2 seconds according to the Google PageSpeed Developers standards. I’m not sure how possible that is when loading a desktop website on a mobile device. I haven’t timed it, and I can tell you that I don’t wait long before I close the window.

9. Responsive Adapts to Future Devices

As alluded to earlier, the benefit of responsive design is that the size of the template is designed based on screen size not device. Obviously, regardless of what size screen someone is viewing your website it will display properly for that screen size.  Unless, there will be a worldwide movement to standardize on one screen size, responsive design is here to stay. Having a mobile website is no longer just a nice feature or after thought. Fully functional websites for all screen sizes are mission critical for the growth of your business. What’s the ROI? check out is this “Full Value of Mobile” calculator by Google. Input your different business and marketing variables to learn how your metrics can be increased with proper responsive mobile design.

10. Responsive Design allows you to keep track of who visits your site

The great thing about online assets is that you can see who visits them, which allows you to increasingly improve your targeting. It should go without saying that with multiple versions of your site, it is more challenging to track analytics. This is the same logic against multiple business listings on various directories like Yelp, Manta, Merchant Circle, Kudzu, etc. because traffic is diluted between the various versions of your site. As a user, it can be extremely frustrating when searching for a site and then needing to find the most current and accurate site listed on the SERPs. Just sayin.

11. Responsive Design saves you money.

Have you ever heard the saying: You get what you pay for? There is a reason that saying still lives today and applies to Responsive design. Sure, a complicated, well crafted, responsive design could be expensive to develop or implement (Unless you select one of the 1000 options available for WordPress websites), but once published, you can maintain it quite easily. This is much more economical to maintain one site rather than multiple sites, wouldn’t you agree?

12. Responsive Design has Pay-Per-Click benefits.

Google AdWords has now converted the web to “enhanced campaigns”. What this means for you is the targeting of various devices is the treated the same. The benefit for you is that a website using Responsive Design makes it a whole lot easier to manage your PPC. Businesses have much more flexibility and control in how they reach consumers which are, you guessed it, using more mobile devices. “Google’s enhanced campaigns represent the biggest single change in the past 10 years to the basic structure of AdWords campaigns,” says Larry Kim, founder and CTO of WordStream.
There you have it: The top 12 reasons to become responsive with your customers.

EXCLUSIVE Haider Habibi Habibi Song Video HD feat Shahid Kapoor Shra...

Border And Text Effects In Psp8, For use with PSP8

Do you want to jazz up your graphics? Want to add a bit of pazazz to your art? Well, this guide features some knowledge, border effects, and even directions to make your own swirlie brushes!

Now, open PSP and get ready to learn! Let's start off with the basics.

-------------------------------------------------
-Border Effects

There are two main types of borders, solid borders, and decorative borders. A solid border is like a colored line that raps around the outside of your image and separates graphics from the rest of the page. You can have borders inside the outside borders to make awesome layer effects. Decorative borders are almost the same, except they are not completely connected. (Example - Dashed Borders)
-------------------------------------------------
Dashed Borders
Open PSP and create an image about 380 x 100 pixels with a white background.

Draw a bit with your paintbrush, just add some color. Now maximize your image.

It should take up the whole page. Now go up to the toolbar on the very top and click "Selections" and go down right below that and click "Select All" There should be a dotted line going around the outside of your image.

We're almost done! YAY! Ok, now look on your keyboard. Go to the very top row next to the F1, F2, F3, F4, and look to the right of the F12 button. It should say "Print Screen". Press it, and it will take a picture of everything currently open on your computer that you can see. Now go to the top toolbar once one. Go under "Edit", move down to "Paste", then move your mouse to the right and select "Paste as New Image"

Now, your image has a dashed border, but you can see all the unwanted parts of your workspace. So go to the left toolbar and click the crop tool. It is the small square with a line through it.

Now drag the segment the crop tool makes just around the image. You might want to zoom in some (Click the magnifying glass on the left toolbar on the spot you want to zoom in). Once you have it fully outlined with the crop segment, double-click to crop it. Wallah! Your image now has a dashed border. So just go to the top toolbar once again, go under "File" and click "Save As". Then, select the spot and name to save it.

-------------------------------------------------
-Font Suggestions and Styles

So you know how to make a cool border for your images. Now what about fonts? Well usually, for siggies, you would put a bigger font saying their name, and a smaller font with sub-text. Look at my signature:


See how it says "Anonymous" in a large font that matches the background; then under it, it says "SOD's coolest member" (my sub-text) in a smaller font? That's the usual format for text on signatures. Of couse, this isn't the only way.

Now, for some font suggestions:

Larger Fonts
Laurenscript
Baby Kruffy (This one is awesome!)
Casual
Chick
Cheri
Walt Disney
Mullet
Dolphins (yippee!)
Jelly Belly
Flubber
Porky's
Gilligan's Island
Cheeseburger

Smaller Fonts
Redensek
Mullet
Georgia
Acknowledge
Tahoma

-------------------------------------------------

Helpful Links


http://peachie.nu
(a few popups though)

Font Places


http://www.dafont.com/en/
http://www.1001freefonts.com/
http://www.fontfreak.com/
http://www.acidfonts.com/

Have satallite tv for almost free IF not free!!!


This is a tutorial by me that i use at home to get all the channels "not including ppv" for almost free if not free... i have every single channel that dish network offers and i dont pay a single dollar..... ok this is how it goes...
-----------------------------------

Get a dish 500 no matter how… “buy /steal”
Sign up with dish network for like “top 100” that will give you like 100 channels… it would cost you like 29.99 or 39.99 not sure…
Then you need to find 3 friends… or parent friends that are interested in having satellite TV….
Dish network allows you to have up to 4 receivers in one house with no prob.
So the next day, or when ever you find a person or 3 of them… call the dish company and tell them that you would like to activate your 2nd receiver and would like to add some additional channels… for that you would need “receiver # and smart card # of that new receiver that is at your friends house” so you give them the info and they hook the second receiver up… just don’t tell them that the receiver is not in the house…
They will hook up to 3 more receivers per account and when you get all 4 receivers you can get all channels on them and just split your bill between the other 3 people that are using your subscription…
For me it works perfectly… I live in Oregon and I have a receiver in my friends’ house in Washington and two in California USA.
I don’t know if this thing would work anywhere else but it sure works for me